newgasrig


I picked up enough parts and pieces to switch to low pressure, thermostat-controlled burners. That should reduce the babysitting required during brewing, and wiull permit me to go ahead with the HERMS project. I’ll probably stop brewing during the transition so I’ll try to get a couple of brews in this (long) weekend to stay ahead. I’m catching up on what’s been sitting in fermenters; got half of the steam beer and SNPA clone kegged, and the other half of the SNPA bottled. Still have half of the steam beer to bottle, plus the two batches of Oktoberfest to deal with. Dunno what to brew this weekend. I have ingredients for a moose drool clone that are getting old (grains are already crushed) so I had better get that done. The vanilla porter keg is getting light so I’ll need something to replace that. Maybe an oatmeal stout?

newkettle


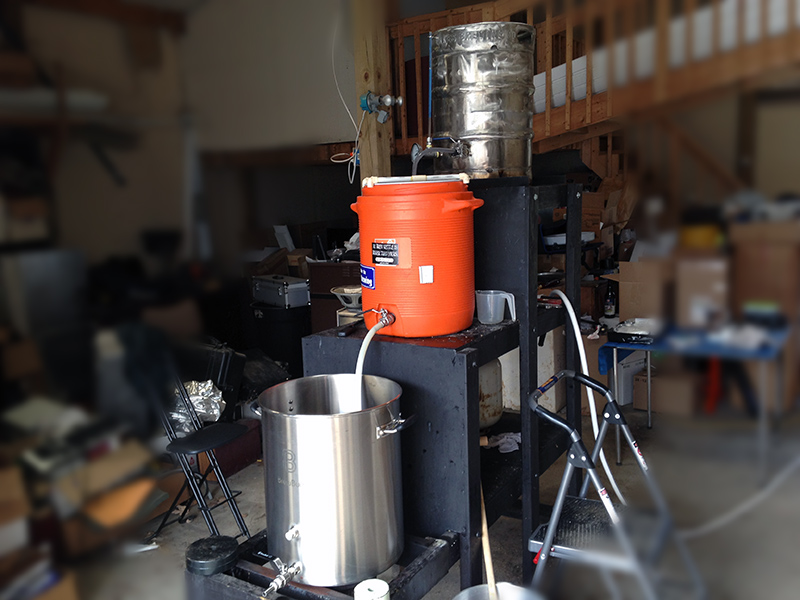
Wow. It’s been too hot (on the rare clear evenings) to do anything with astronomy so no activity to report there. The observatory remains set up and ready to go when I get to it. On the other hand, I’ve been doing 5 gallon all-grain homebrews most weekends. Last weekend was my first 10 gallon batch (California common) and that all went well. The latest boil burner revision was successful; brought 13 gallons to a boil very quickly and boiled it down to 11 gallons in just over an hour. I used to struggle to get a good boil with 7 gallons in there. The photo above shows the rig with the new boil kettle. I doubt that it has improved performance, but it looks nicer than the old keggle (converted beverage keg) and the laminated flat bottom helps to ensure even heat and eliminates the risk of wort scorching. The thermometer hadn’t arrived by brew day so there’s a plug above the ball valve where the thermometer should (will) be. Don’t much need a thermometer in the boil kettle; it is either boiling or it isn’t. It is still handy to watch the temperature as the wort cools, though.

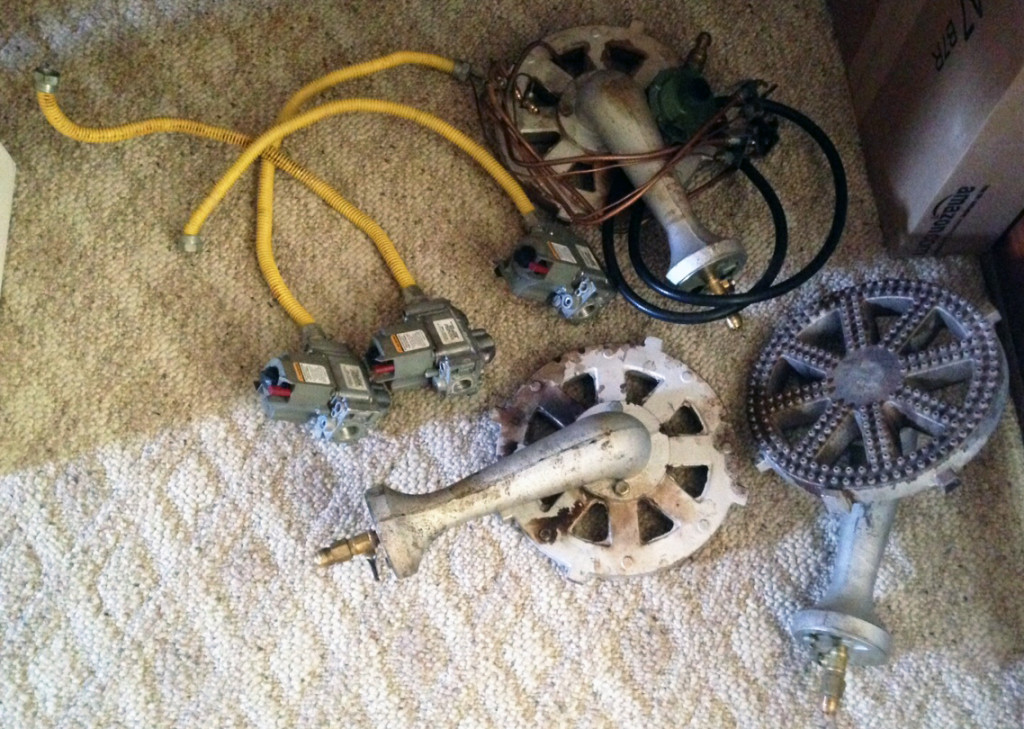
Next for the brewery? HERMS (Heat Exchanger Recirculating Mash System), I believe. Unless I go with RIMS (Recirculating Infusion Mash System) . I know that I want to recirculate the mash for several reasons and I may as well add temperature control while I’m at it. I picked up a March pump and I have an extra wort chiller that could be used as a HERMS heat exchanger so that’s tempting. I’d need to convert the HLT burner to low pressure (or maybe natural gas) and add a furnace-style Honeywell valve/pilot/igniter, plus a temperature controller. Still less expensive (but slower) than adding an electric RIMS system, and I’d keep 120VAC (or worse, 240VAC) away from the brewstand and all the liquids to be found there. I’m still evaluating both options.


With the pump available, I could also modernize things a bit and switch from the old school three tier gravity brewstand to a two tier (or even one tier) rig. I’ve started work on a two tier stand. It is MUCH lighter than the wood stand I use now, and because it is only two tiers it is much lower. I could get rid of the stepstool and see into all three vessels. If I go with the HERMS I’ll probably do the gas valve modifications to that stand so I can keep brewing on this one while I fidlle around. Then, when everything works, switch it all over at once to the new stand.


I’ll try to be better about updates in the coming months.

collage6-2-2015


I’ve explored the three simplest levels of homebrewing so far. All have used extract rather than mashed grains (mashing is the process of converting the starch in the grains to sugars). “Extract” is wort (unfermented beer) from grain that has already been mashed by a brewery and then condensed into either a syrup or a powder. Extract brewing is very suitable for stovetop homebrewing, generally using only one kettle and burner, and a limited water volume to boil. The simplest method uses hopped extract. That’s what Mr. Beer is. There’s no boil and no hop additions. Just heat water, dissolve the extract, cool, and stick in the fermenter. The amount in the kettle is usually smaller than the desired batch size so makeup water is added. This is planned for in the recipe so the result isn’t diluted. In the fermenter, yeast consumes the sugars in the wort and produces carbon dioxide and alcohol. The CO2 isn’t used and is vented (after fermentation is complete, CO2 is added for carbonation). The alcohol is the point of the exercise.  A more complicated method of using extract is simply referred to as extract brewing. In this case,the brewer didn’t add hops before condensing the wort. To use this, you heat water, dissolve the liquid and/or syrup extract, and then bring to a boil, usually for one hour. During the boil,  hops are added at various intervals to cancel out the sweetness that is a characteristic of wort, and to add flavor and aroma. Then it goes into the fermenter and any needed makeup water is added. Partial extract brewing is similar but before dissolving the extract one steeps specialty grains in the heated water, usually for twenty minutes or so. These don’t add any fermentables to the wort but do add color and more compexity to the taste. From that point, the process is the same as extract brewing. I’ve done those three so far, and have found that increased effort brings rewards; the partial extracts have been my best beers.

The next level of complexity is called partial mash (or, sometimes, mini-mash). In this process, some (usually about half) of the extract is replaced by actual grains. These are “mashed” (soaked at a controlled temperture for an hour or so) and do contribute fermentable sugars to the wort. Then the extract is added to make up the remaining fermentable sugars. The result is then boiled and hops added as required. After the boil  makeup water is added if needed, and it goes into the fermenter.

The next level of complexity is all grain brewing. In this, extract is generally not used and, when used, provides only a small portion of the fermentable sugars. Usually, all of the fermentable sugars in the wort come from conversion of starch in the grains. All of the wort volume for the entire batch is present in the boil; no makeup water is added. These characteristics require a more complex setup and the greater (full batch) boil volumes generally dictate a larger heat source than a stovetop. Propane is the most common fuel, though a number of electric brew systems are in use as well.  I’ll write about all grain brewing after I gain some experience at it. There’s a stovetop variant known as Brew in a Bag, but most all grain brewers use two or three (usually three) vessels on a brewstand with multiple burners and multiple levels so that gravity can be used to transfer liquids from one container to another. That’s the system I’ll be using. The modern trend is toward single level brewstands incorporating one or more pumps to manage liquid transfers. A number of newer setups also include temperature-controlled burners (either gas or electric), for varying degrees of automation.

I’ve been pushing “production” because there’s a gathering of local astronomers coming up at my place and I want to be able to offer some variety of homebrew samples. I’ll be kegging batches 4 and 5 tomorrow night. batches 6 and 7 are in the fermenters and won’t be ready for this sesson – but there’ll be another soon enough. I figure I’m sufficiently ahead to relax a bit and work on infrastructure. It’s been a learning experience, for sure. Fortunately, none of the lessons have been particularly expensive or disastrous. This is fun.

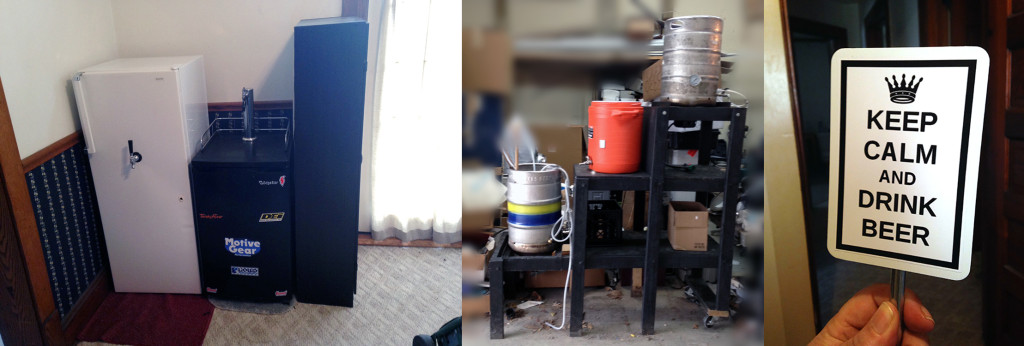
The photos at the top of this post show some of the changes I’ve made. At the left are the two kegerators. They will permit me to keep 6 kegs cooled and under CO2. In the middle is a project that has not yet reached the stage of producing anything. It will permit me to go to all grain brewing, and to increase my batch size from 5 gallons to 10 gallons (or a little more). The trial run of that rig is planned for June 13 so watch this spot. At the right is a tap handle that is currently installed on one of the kegerators, though it wasn’t yet there when the kegerators  photo was taken.

5-16-2015collage


Batch #1 is in the keg under 20 pounds of CO2 and as cold as I can get it. It has been in there for maybe 24 hours and the carbonation is coming along. I plan to drop it to serving pressure tomorrow and maybe draw a bottle or two to take to my dad at the old folks’ home on my obligatory Sunday visit. The excess furniture is supposed to leave Monday so I’ll be able to bring the kegerator(s) into the house for greater convenience.


Batch #2 is plugging away in the fermenter. No visible signs of fermentation so it’s really only conditioning.

Batch #3 is a mini-batch to use up a one gallon hit that came with some stuff I picked up. It’s a West Coast IPA and will be my first experience with dry hopping. I’ll probably bottle it all rather than tie up a keg with beer I don’t currently drink (and it will fill only 10 bottles or so anyway). If I acquire a taste for IPA beers later I can always dig them out. This is another partial extract and I never had that heavy aroma during steeping that happened on batch #1. Of course, the specialty grain bill was far smaller. Turns out that there’s not much danger of a boilover with one gallon in a 5 gallon pot! I might do some more mini batches to try other brews that I don’t normally drink. There’s no economy of scale, of course, so it’s an expensive way to go.


firstmug


Batch #1 (Vienna Lager recipe processed as an ale) is in the keg! Kegging took longer than I had planned, because I had kept putting off the prep work; had to put new connectors on the beer and gas lines in the kegerator, had to clean and sanitize the new keg, etc. Got it all handled, rocked the keg at 20 psi to begin carbonation, and tried to draw the first sample. That was problematic, as the flow kept stopping. I finally discovered that I had junk in the bottom of the keg. I apparently wasn’t as careful as I had thought to avoid transferring trub. The right answer is to drain the keg into something else, let the junk settle, and refill the keg more carefully. As I proved the issue by bending the keg’s liquid tube a little (making its pickup higher), the easy answer is to go ahead and run it until the level in the keg drops below the liquid tube – THEN fix it.

I drew a test glass. It’s not very clear but I already know there’s junk in the keg so no surprise there. Maybe it will clear after resting for a day or two. It’s darker than I expected but I don’t remember what color the vendor even promised. Tastes warm and flat – no surprises there!

The new (to me; actually fairly old) gravity-feed all grain brewing rig arrived this week. It will benefit from lots of tuneup and update work before I begin to use it, but it has real potential.

batch2-20hoursmuntons

5-9-2015

Managed to grab a couple of hours in the kitchen today so I threw together a quick extract batch (Munton’s Cervesa). It’s fast, easy, and cheap and I suspect it will taste a lot like a cheap Mexican lager. That would make it a better choice to offer most folks (including me) than a hopped-up craft beer. If it’s any good I’ll try to keep some on hand all the time while I educate my palate with hoppier stuff. This was a quickie; no photos, no videos, no notes. Just a loaded fermenter and some anticipation.

The other thing I did today was to pick up an old school gravity feed all-grain setup from a local homebrewer who has become inactive. One keggle with propane burner as a hot liquor tank, a cooler mash tun, and a keggle with propane burner as a boiler, all on a three level brewing stand. There’s a LOT more room in the barn than in the kitchen (or there will be, after I reorganize things) so it should make things easier and more enjoyable all around.  I just have to clear a space for it before delivery on Wednesday.


boil2

5-2-2015

First brew; 5 gallon batch, Vienna Lager partial extraxt kit from Grape and Granary in Akron, Ohio.  the kit intentionally contained ale yeast despite the lager label. The guy at the store said it was as close to a lager as I would get without lagering; supposed to be similar to Dos Equis.

I used spring water from Beuhler’s; they had 2.5 gallon jugs. There’s a refill station there but I didn’t check pricing. I’ll probably keep using that until I can analyze my water. I have the Campden tablets to fix the choramine (and I can SMELL the choramine so there’s plenty of that) but don’t know about PH or minerals. I used Star San on everything and followed the advice I have seen about also loading up a spay bottle. That was a big help. If there was a hot break I missed it. The 5 gallon kettle contained the three gallon boil with no issues.

The steeping grains (the recipe doesn’t say what they are – the label probably did but that got thrown away) released a strong swampy odor. I don’t know whether that is normal. The odor filled the first floor and didn’t change after adding DME and LME, or even after adding hops and boiling for 45 minutes! Hope that’s OK.

Thought about rehydrating the dry yeast but since it’s a store kit I figured it was fresh enough so I just threw it in. Just took a look after about 6 hours and no airlock activity but a peek through the bung showed what appeared to be an even layer of krausen. I see why folks prefer to use clear carboys rather than the plastic buckets I have; can’t see what is going on in there.

Dunno about OG – checked it from the spigot and it was 1.100! That didn’t sound right so I pulled a sample from the top and it was 1.038. Kit said it should be 1.056. I realized that the makeup water hadn’t mixed well with the wort because of the different readings so I mixed it all up but forgot to take a new OG reading. I’m sure it is somewhere between 1.100 and 1.038!

Since everything was new, I put 5 gallons in the brew pot to boil and release whatever was in the metal. Stuck the wort cooler in there, too, for the same reason. Then used the chiller and dumped the resulting warm water. That was problematic; the damn adaptor doesn’t fit my ancient kitchen tap so I just held it on and let it leak. Fortunately I hadn’t made the water run yet so I picked up some ice while I was out. Used 10 pounds to chill the wort when the time came. Still have 10 pounds of ice and 5 gallons of spring water for the next brew.

It was a busy day. Took five or six hours from setup to pitching yeast and rinsing the hardware. I know a partial extract shouldn’t take that long, but I had to organize the stuff and boil the metal items. Next brew day will be easier. I think I’ll do a full (unhopped) extract next. AIH has a “Cervesa” kit by Muntons on sale (about half the price of the kit I used today). At least I won’t have to worry about the specialty grains smelling up the place. I also have a partial extract kit that came with some hardware I bought – but it is really old. I think it has only DME so might be OK if I replace the yeast. I’d hate to waste a 5 gallon batch, though. And there’s the Mr. Beer kit I bought when they had their big one day $20 sale a few weeks ago.

The stovetop is slow in bringing 5 gallons to a boil and not much faster with the three gallons boiled in the kit recipe. I’d like to get a nice, big burner for the barn. There’s gas out there so I wouldn’t have to fiddle with propane. That would help with the smell, too, if that is always going to happen. Since I’m apparently going to be using spring water, the barn may be ideal (no water lines to the barn). If I straighten things up out there and dump some junk I could have quite a large area dedicated to brewing. I keep it at 50 degrees in the winter out there (and can easily increase that to 70 degrees for a brew day) so it would be a decent environment. It gets HOT in the summer but a big fan and two open doors would probably handle that.

I have two 5 gallon ball lock kegs on hand and two more on the way (all new). Two will fit in the Edgestar kegerator, though only one tap is connected. I ordered a picnic tap to use on a second keg until I decide whether to switch to a two tap tower. The larger kegerator will handle three or four kegs and it will be easy and cheap to add additional taps to that one. I first have to decide whether it will remain a kegerator or become a controlled temperature fermentation chamber. I’m considering doing that and making a keezer to replace it. Right now the priority has to be getting the Edgestar prepped to accept this batch in time to accept it. I switched the beer and gas connectors over to ball lock so it’s ready to run one keg. I need to get a gas line in there for the second keg, and get the temperature adjusted. I plan to force carbonate right away, and then load up some bottles to pass around (if it is any good). Sure sounds easier than filling them from a bottling bucket and carbonating with sugar for a week or two.
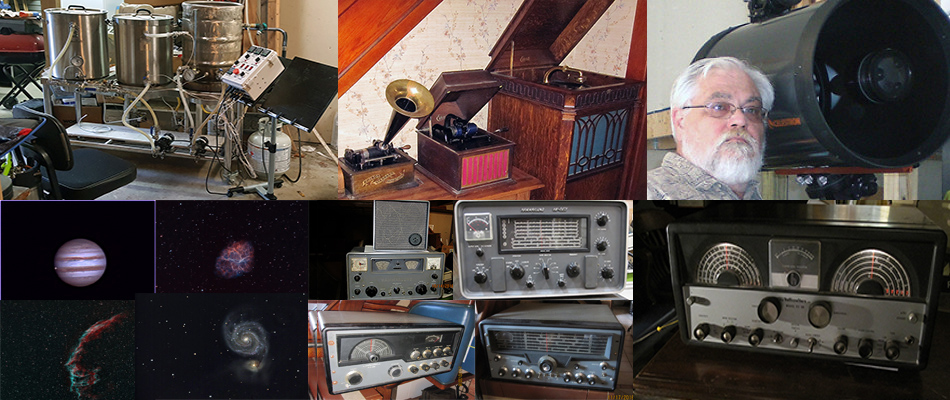
Just a few notes to show that I’m still here and still interested…

Still no images since September, but everything is set up for an imaging session the next clear weekend.

I have switched from the QSI683WSG-8 to an astro-modified Canon 450D DSLR. It’s been more than ten years since I shot with a DSLR so I don’t quite know what to expect. I know I’m losing the low noise of a cooled camera, and the sensitivity  of unfiltered luminance frames. This camera gets rid of the amp glow that plagued my original (300D) camera so that will help.

Made the trip to NEAF in Suffern, NY last weekend and had the usual great time. I enjoyed speaking to the usual folks and seeing the usual astro goodies. As in recent years, I failed to take photographs so I won’t be reporting on the show beyond that.

I have found something new to do on the cloudy and/or windy nights. I’m just getting set up for making homebrew beer. Got a couple of kegerators (keg refrigerators), along with some 5 gallon kegs. Also a boiling pot, fermentation buckets, and all the fiddly bits needed to make stuff to  go into the kegs. I even made the trip to the next county (the nearest homebrew store) and picked up fresh ingredients for my first 5 gallon batch.

Nothing really new here; no new images since September (and thus no new posts since September). It’s clear tonight but lots of Moon, pretty cold, and I don’t feel well so it’ll be another missed night. That said, I hate to permit the blog to stagnate for so long and decided to post something just to keep it alive. Going forward, I’ll try to come up with something worthwhile to post at least monthly. When the images are flowing, of course, it will be much more active than that. I am not claiming that this is the first such worthwhile post. It’s just an attempt to get things started.

It’s been a blast so far. From the anticipation of waiting for the new gear to arrive to the fun of setting it all up and grabbing the first images to the ongoing enjoyment of fairly steady use ever since, this project has provided plenty of fun for me. With any luck at all, it has also provided information to others.


Watch this space!

crab


I guess I’m still in a bicolor rut, but at least I got away from the widefield stuff. Here’s M1 with eight ten minute exposures each Ha and OIII. Working at F/8 instead of F/5 is about one aperture stop decrease, so Ideally I’d be doubling exposure time.  I lack the patience so I’m still using 10 minute exposures. Click the thumbnail above for the larger version, or click here for less compressed.